
How to Use This Site
How to use this website
On the home page of this website, you can start your research in one of three ways:
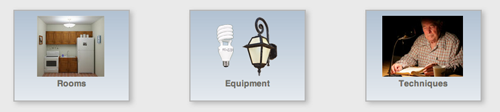
- If you would like to light a particular room, such as a kitchen, click on the Rooms button. This will give you various room or space types to select from, so you can find the one that most closely resembles the one you are lighting. Selecting a room will bring you to various lighting designs to consider.
- To learn about lighting with specific technology or equipment, such as LEDs or downlights, click on the Equipment button, which will bring you to a series of written guides.
- If you would like to know more about a certain lighting technique, such as task lighting, click on the Techniques button, which again will bring you to a series of written guides.
Because the lighting designs and guides are not specific to your residence, look at several designs and guides to get ideas to apply to your space. For example, a reading light shown in a living room might be appropriate for your bedroom. Also, keep in mind that while the Rooms button brings you to lighting designs, and the Equipment and Techniques buttons bring you to written guides, the designs and guides pages are cross-linked, with the design pages providing links to the most relevant guides and the guide pages providing links to example designs.
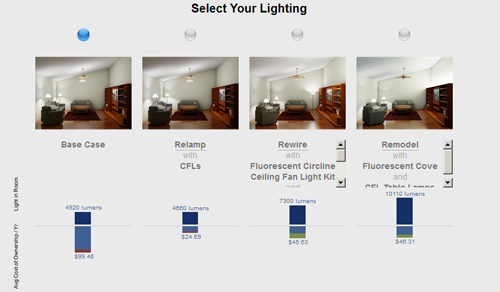
When you click on the Rooms button and then select a specific room (such as the medium living room with sloped ceiling), several lighting designs are given. The first design is always the "base case," which shows a typical, traditional way to light the room. The other designs represent improved lighting, which maintain or improve the lighting quality of the base case. The improved lighting is categorized based on the level of effort needed to install it:
- The "relamp" level of effort can be achieved by anyone by replacing light bulbs (called "relamping" in the lighting profession) or by plugging a new fixture into an electrical outlet.
- The "rewire" level of effort requires an electrician's skills to replace a hardwired lighting fixture at an existing junction box.
- The "remodel" level of effort is for a room that is being renovated or newly built; the installation requires the skills of both a carpenter and an electrician.
Typically, the installation cost is commensurate with the level of effort needed.
Both computer-rendered images and numerical data are shown for each lighting design. The image and the top part of the graph help you judge the appearance of the designs relative to one another. The brightness of the image is representative of the amount of light in the room. (For those familiar with photography, the exposure for all of the images for one room is the same.) The top bar on the graph shows an approximation of the total amount of light, measured in lumens. In general, the more lumens (i.e. the taller the bar on the graph), the brighter the room. Some designs provide less light than the base case but the light is provided where it is needed the most, such as task areas. The bottom part of the graph provides the cost of ownership. The lower the cost of ownership (i.e. the shorter the bar), the better. The cost of ownership is split into the cost of electricity, the cost of replacement bulbs, and the up-front cost of the lighting equipment, all averaged over an assumed 15-year life of the installation. The amount of energy used by each pattern can be compared by the height of the electricity portion of the cost of ownership graph. As you compare the designs, remember that in general, for both the amount of light (lumens) and cost of ownership ($/year), the closer the end of the bar is to the top of the screen, the better.
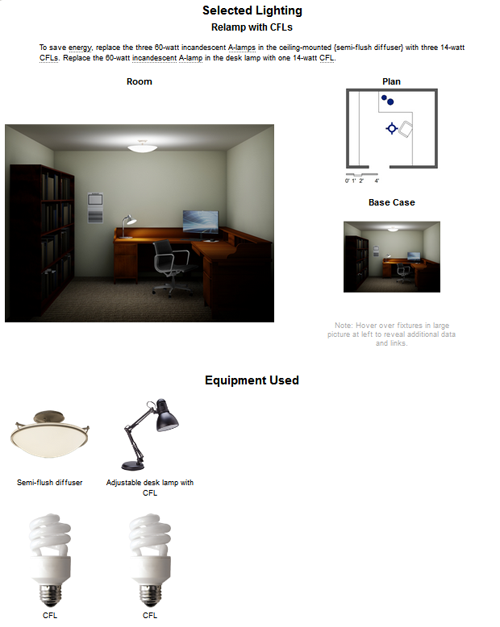
Once a specific lighting design is selected (such as "Relamp with LEDs"), more information is provided. You will see a larger version of the room image. You can mouse over (hover the cursor over) the lighting fixtures in the room to learn what they are. To the right side, you will also see the top-down plan view to show the location of lighting in the room and an image of the base case for comparison.
Below that section, the specific lighting equipment used in the pattern is shown. You can click on each equipment item to be brought to a guide page about it.
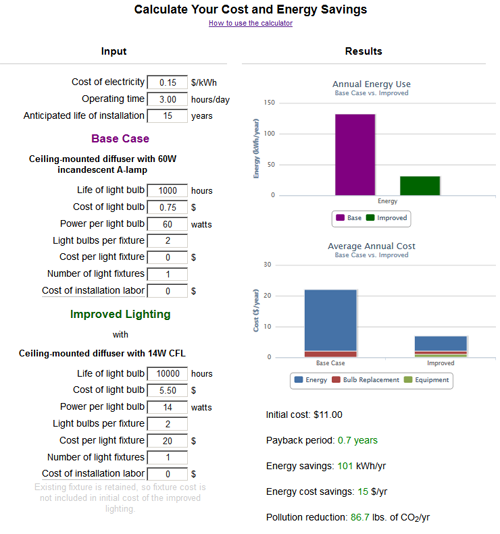
Below the equipment is a calculator that gives more detailed information about the cost, payback, and energy use for each pattern. While the calculator starts with suggested values, you can click in each box to enter values specific to your situation. A more extensive description of how to use the calculator can be found in the How to Perform Economic Calculations guide.
Ensure that all work performed adheres to the National Electric Code and local building codes.